How Phasmida Lighting Works
In our setup, Phasmida Lighting is not just a decorative strip. It is part of a broader Phasmida workflow that connects hardware, cloud control, and scheduled lighting scenes into one system that is easier to operate day after day.
This article explains what the physical RGB module actually is, how the Phasmida Lighting system is designed, how you control it in Phasmida Smart Cloud, and how scene management fits into the experience. It also closes with a short look at DLight, our ambient light measurement direction, because measuring light turns out to be just as important as generating it.
What the Hardware Actually Is
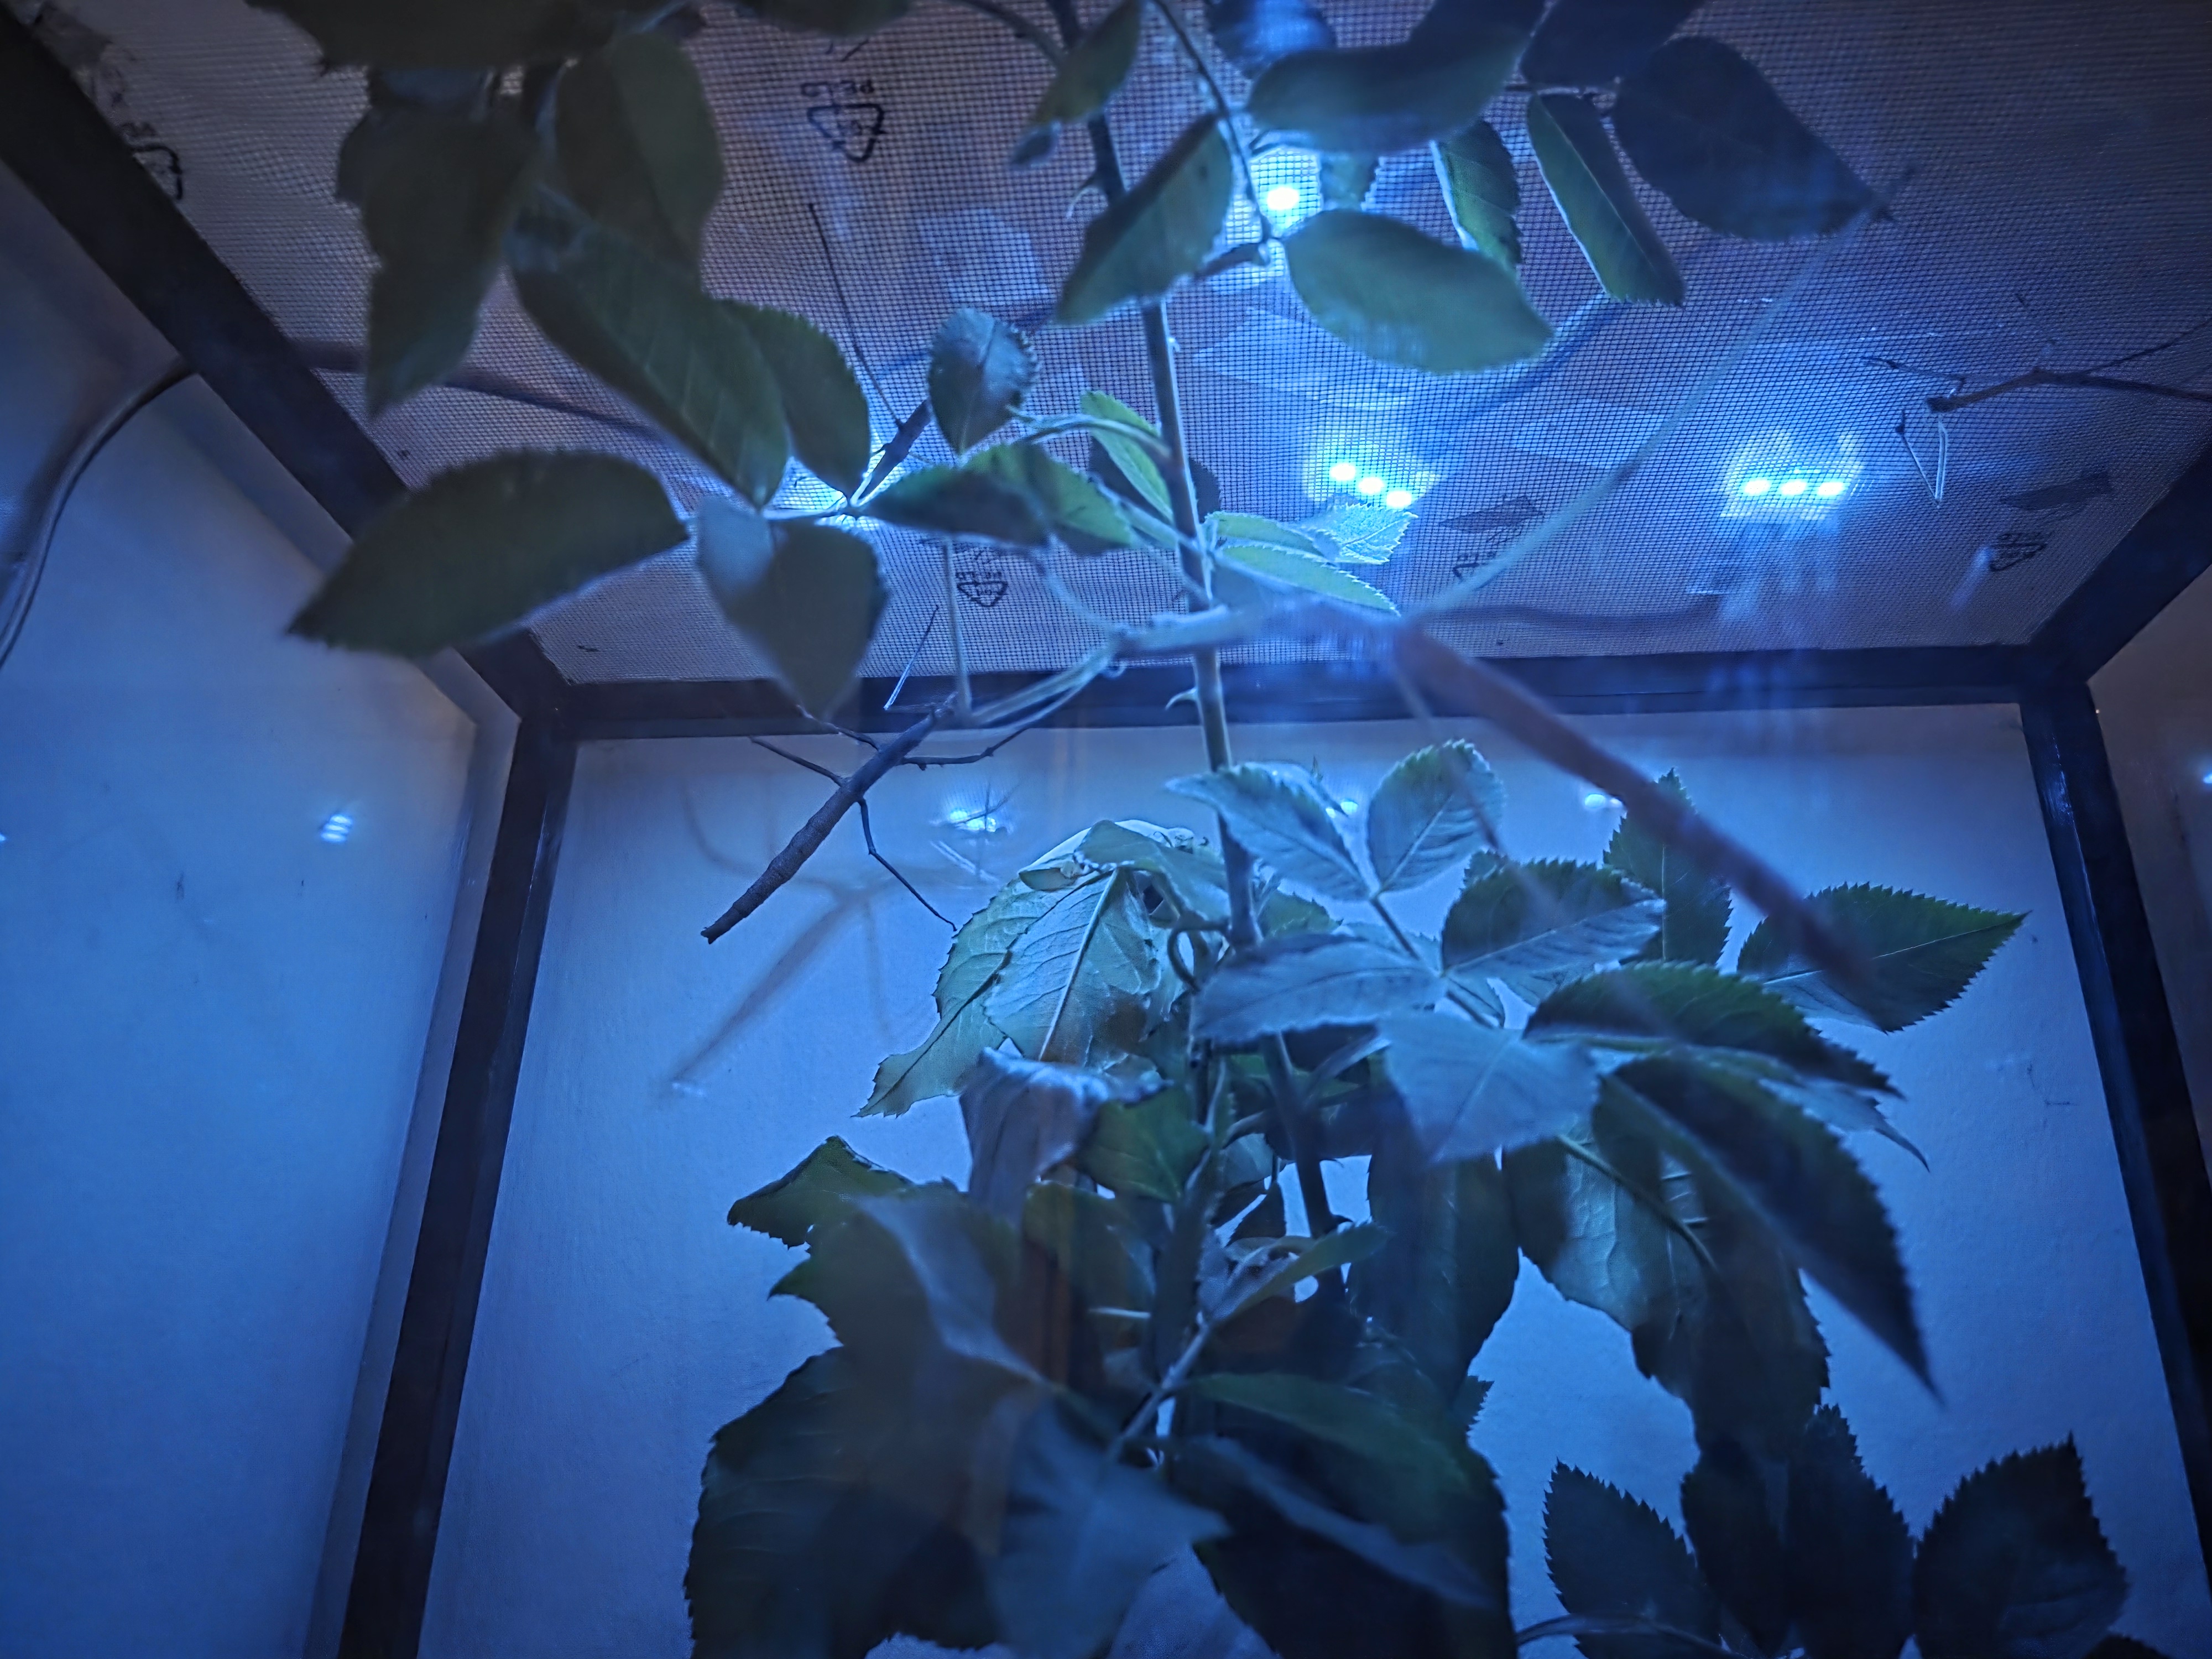
The current Phasmida Lighting setup uses four chained SK6812 RGB modules. Each module contains three RGB LEDs, which gives a total of 12 LEDs controlled as one lighting surface.
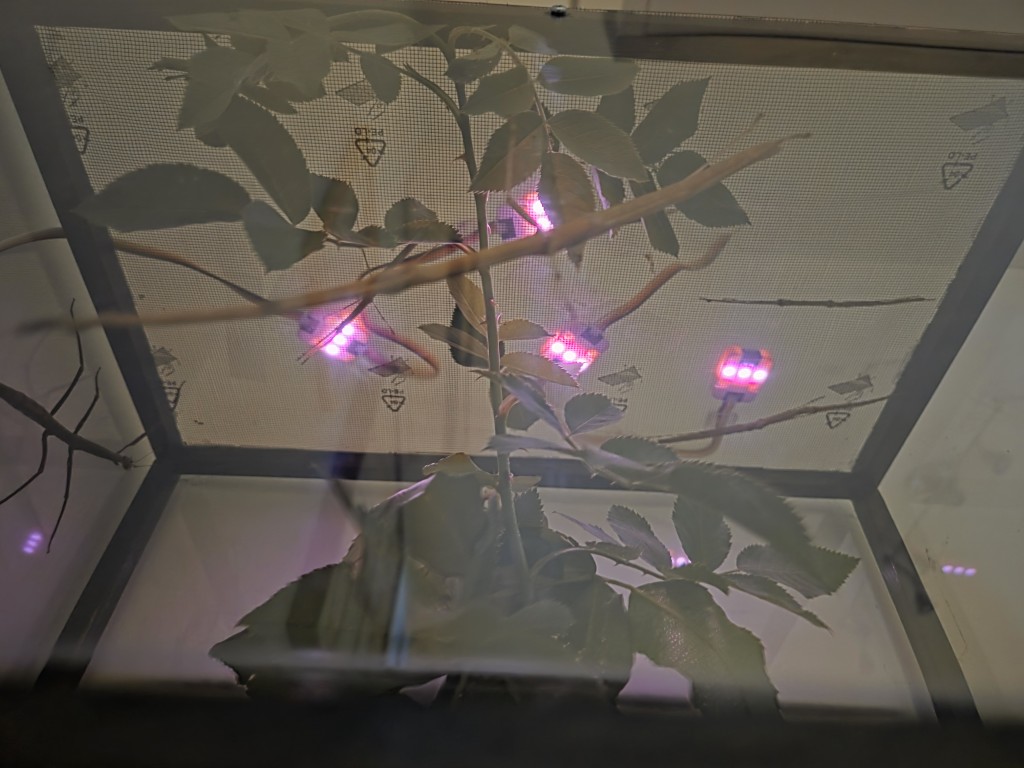
That detail matters. The system is physically made from multiple modules, but from the user perspective it behaves as one coordinated RGB light output. In the current implementation, Phasmida sends one color and one brightness state across the full chain, which keeps control simple and predictable.
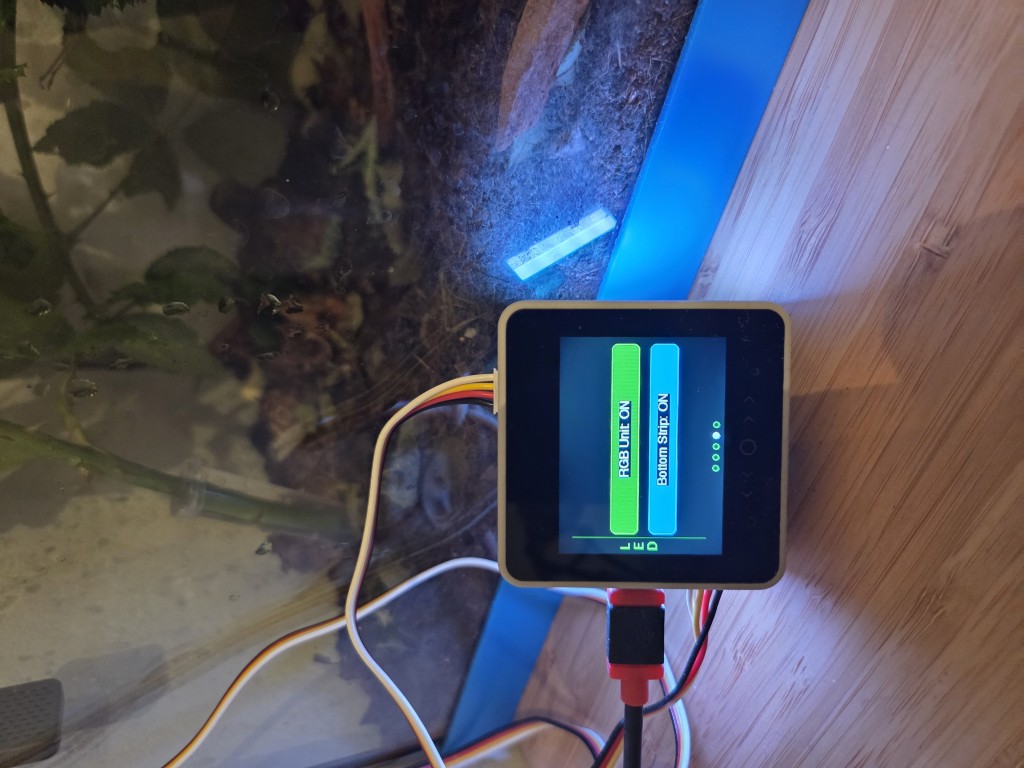
This RGB chain is separate from the built-in bottom LED strip available on the controller base. In other words, the Phasmida Lighting module is its own lighting path, intended for terrarium lighting scenes rather than general device feedback.
At the hardware level, the modules are compact, lightweight, and designed for daisy-chain wiring. They run on 5V, use SK6812 addressable RGB LEDs, and provide the color precision needed for smooth fades and stable gradients.
In practice, that gives us a setup that is small enough for flexible enclosure mounting, but capable enough to create clearly visible day-phase transitions, warm dusk tones, low night light, and more visually expressive color states when needed.
How the System Was Conceived
From the beginning, the idea was not to build a complicated lighting lab tool for engineers. The goal was to make Phasmida Lighting usable inside a real biosystem workflow.
That means the design had to satisfy a few practical constraints:
- lighting should be cloud-controlled, not tied to manual button presses on the hardware
- transitions should be smooth, not abrupt
- schedules should be visible to the user, not hidden in opaque automation
- the RGB module should be possible to activate after the core device is already in use
- the system should fail safely if lighting commands stop arriving
Those choices shaped the current product behavior.
Phasmida devices boot with the RGB chain off by default. When the cloud sends a lighting command, the device applies a target color, a brightness level, and an optional fade duration. If needed, the device can also hold that state for a defined time. If the device stops receiving lighting commands for long enough, the firmware watchdog turns the RGB output off automatically instead of leaving it stuck on indefinitely.
That is a small but important design decision. For a terrarium setup, reliability matters more than novelty.
How You Control Phasmida Lighting
From the user side, Phasmida Lighting is controlled through Phasmida Smart Cloud.
Once an RGB module is activated on a compatible device, the portal exposes RGB lighting controls inside the biosystem and device views. If there are multiple RGB-enabled devices in one biosystem, the portal lets you switch between them from the same RGB controls panel.
The control model is built around a few simple ideas:
- choose the device you want to manage
- assign scenes to it
- define when each scene should run
- turn scene execution on or off
- preview what the lighting should look like over time
This is why the UI is more than a simple color picker. The goal is not just to send a color once. The goal is to control lighting as part of a repeating environment routine.
Activation Without Reflashing
One of the more practical parts of the system is the lighting activation flow.
The RGB module can be connected after the main device has already been set up. Instead of asking the user to reflash firmware or rebuild the device configuration manually, Phasmida uses a guided verification flow.
The principle is straightforward:
- Connect the RGB module.
- Start lighting verification from the portal.
- The device runs a visible test pattern.
- The user confirms that the lighting test is visible.
- The system marks lighting capability as enabled and unlocks the lighting interface.
This matters because the hardware has no automatic physical readback channel for the RGB attachment. Rather than pretending that plug detection is magical, the product handles it honestly with a user-confirmed verification step.
That makes the experience less fragile and much easier to support.
What Happens When You Send a Lighting Command
Under the hood, the cloud sends a set-light command to the device. That command defines four things:
- the target color
- the brightness
- the fade duration
- the optional hold duration
For the end user, the important part is the behavior.
If a fade is set, the RGB chain transitions gradually from the current visible color to the new target color. If a hold duration is set, the device keeps that color after the fade finishes. If no hold is set, the color remains active until the next lighting instruction or until the device watchdog switches it off after a longer period without updates.
This makes Phasmida Lighting suitable for calm scene transitions instead of hard jumps between states.
It also means the portal can build schedules that feel natural to watch. A warm low-brightness morning tone can ramp into a brighter daytime state, then cool down again later in the day without the user having to manually issue separate live commands.
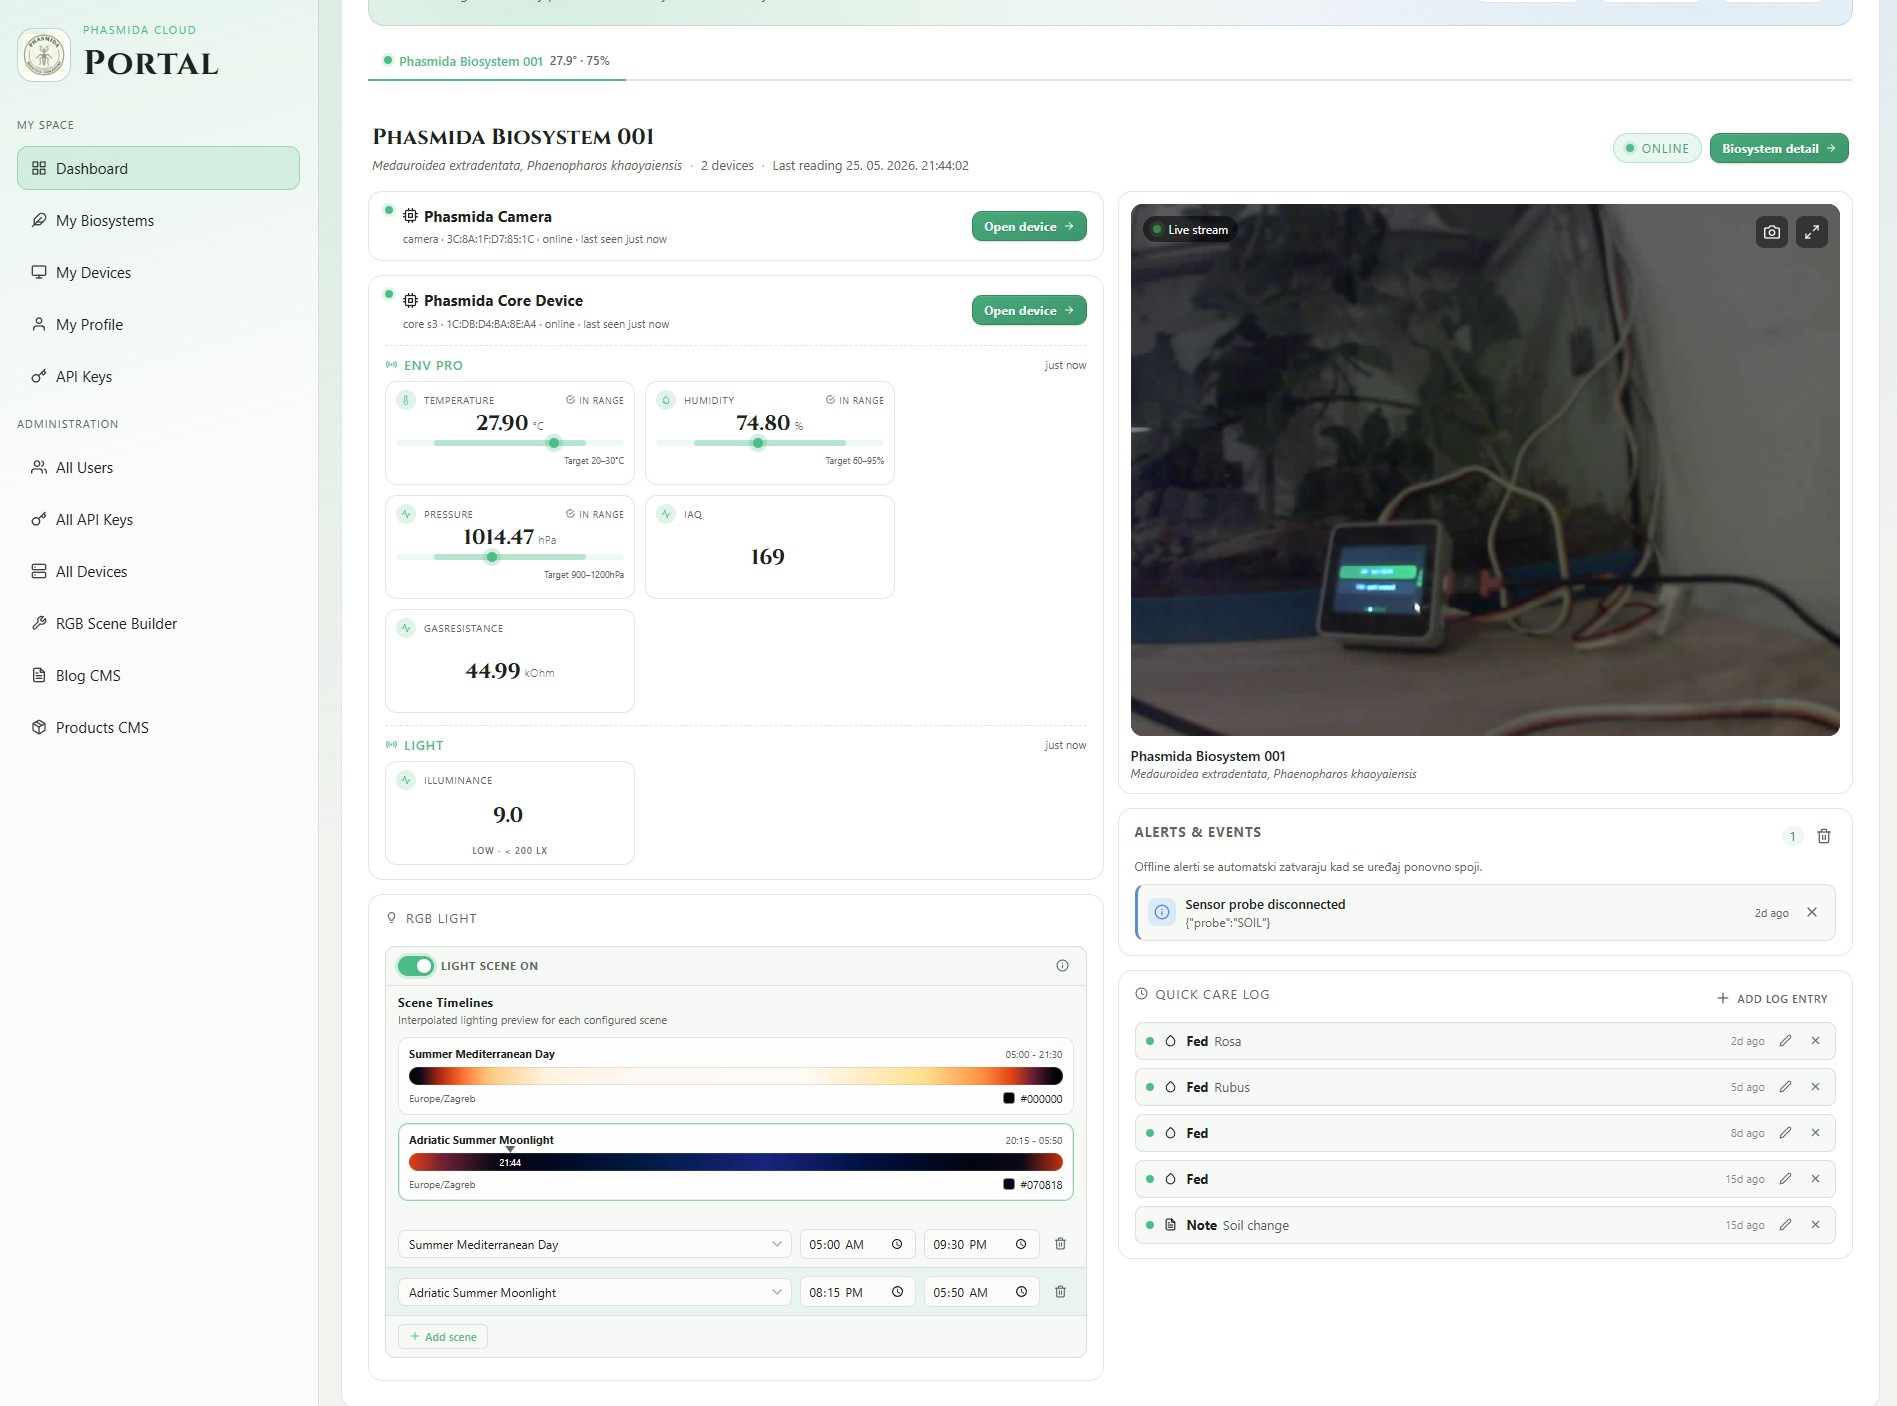
What the Portal Shows You
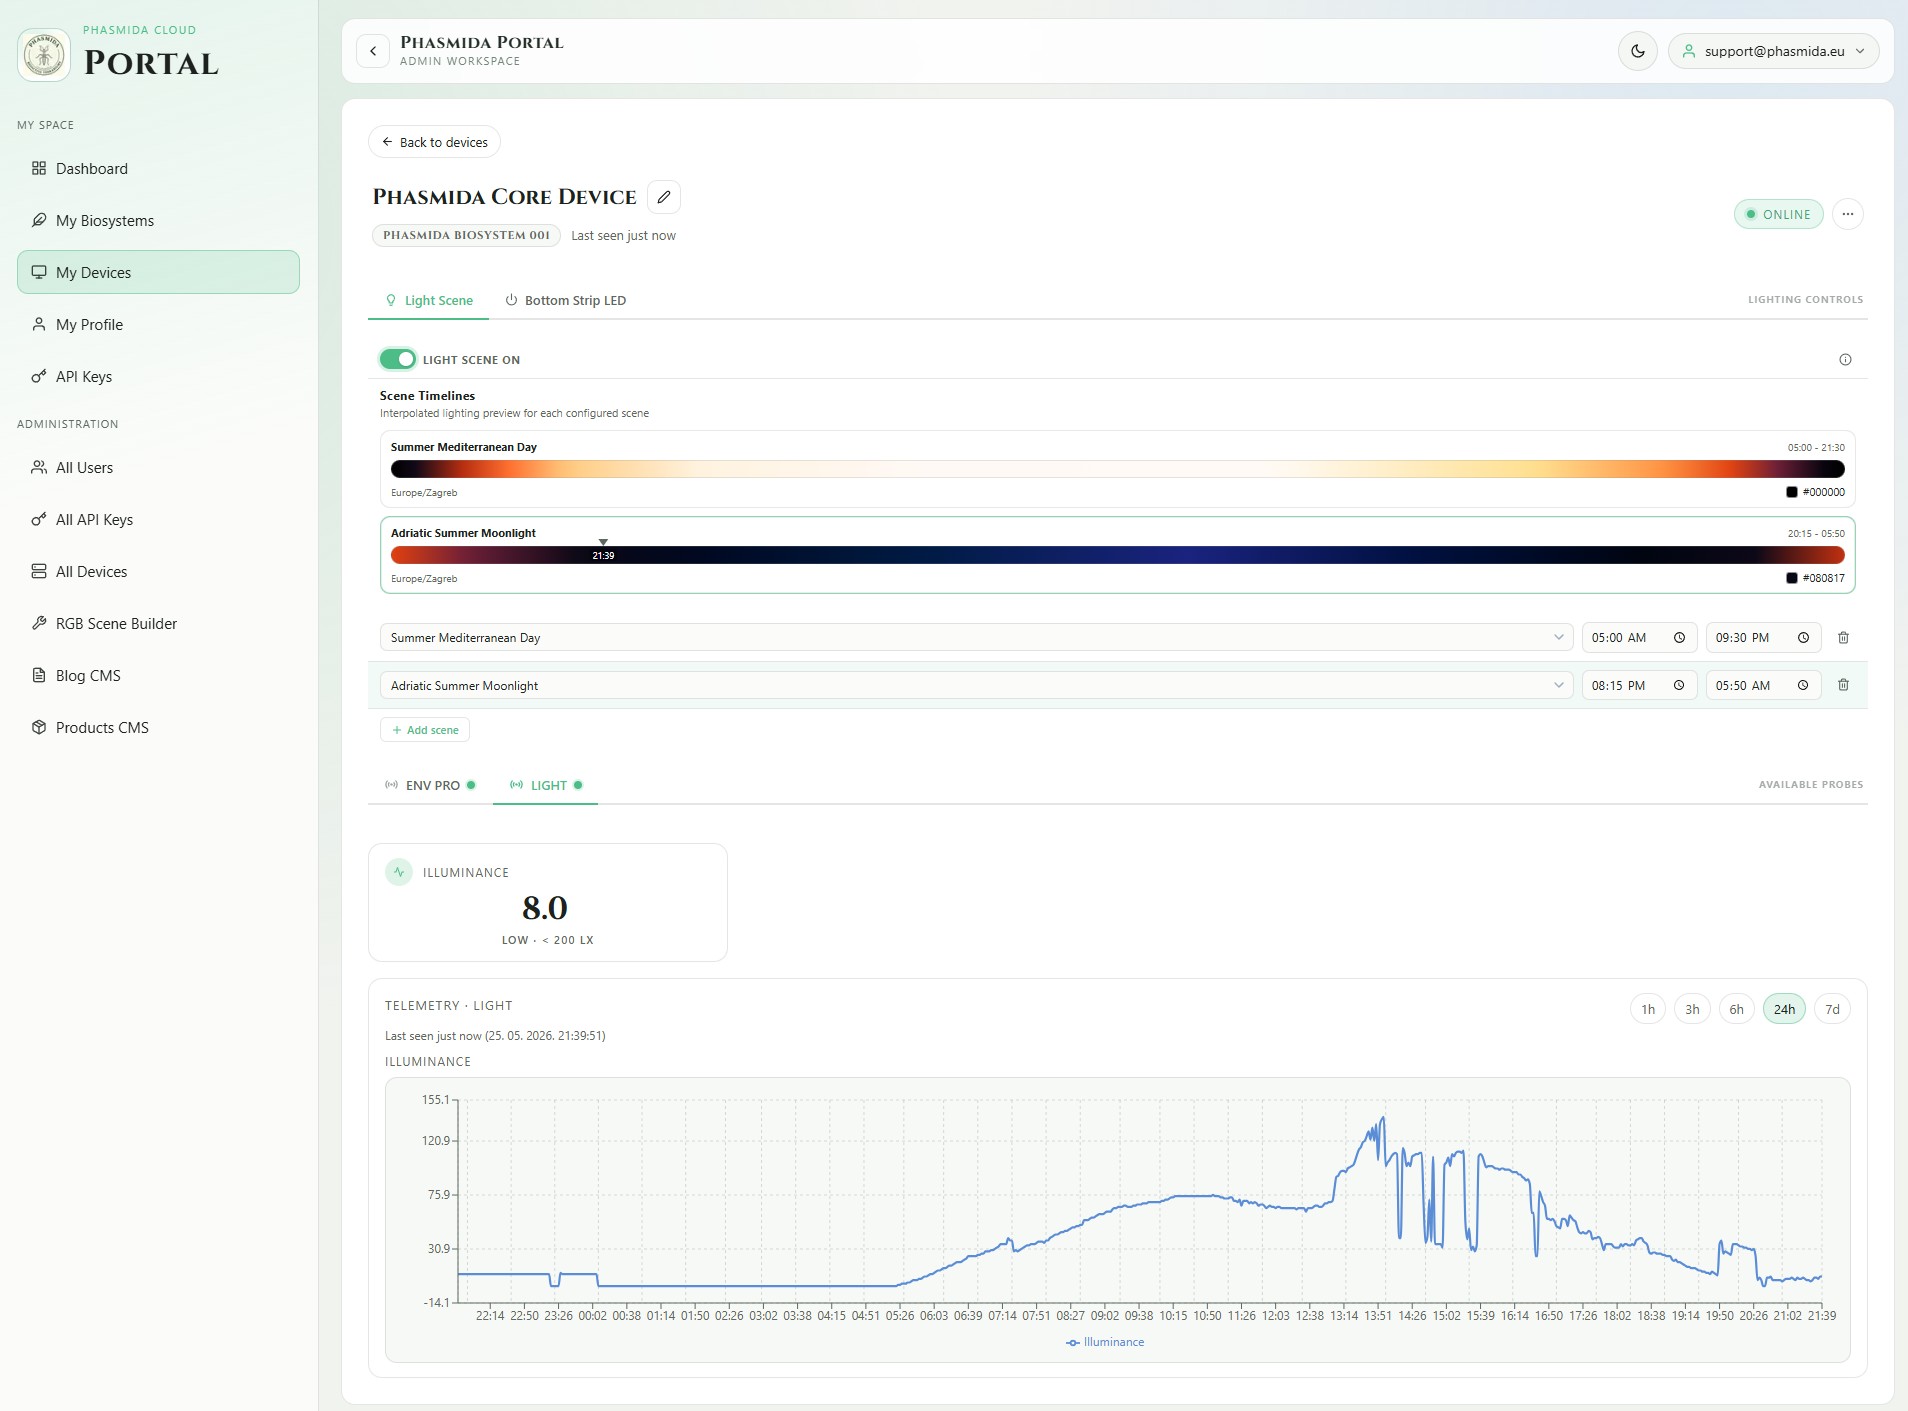
Phasmida Smart Cloud is designed to make lighting automation visible.
The lighting interface exposes scene rows that let you choose which scene should run, and during which time window. A single row can cover the whole day, while multiple rows let you split the day into separate lighting phases. Overnight ranges are supported, which is useful when one part of the cycle naturally crosses midnight.
There is also a dedicated scene timeline view. This gives you an interpolated lighting preview for each configured scene, including a current-time marker and the currently expected color. That preview is one of the strongest parts of the experience because it makes the schedule legible at a glance.
Instead of guessing what a lighting schedule might do later, you can see the shape of it in the portal.
The interface also includes a power toggle for scene execution. Turning the scene engine off does not just hide the schedule. It pauses execution and sends a light-off command to the device.
Scene Management, Briefly
Scene management is the layer that turns Phasmida Lighting from a single live action into a daily routine.
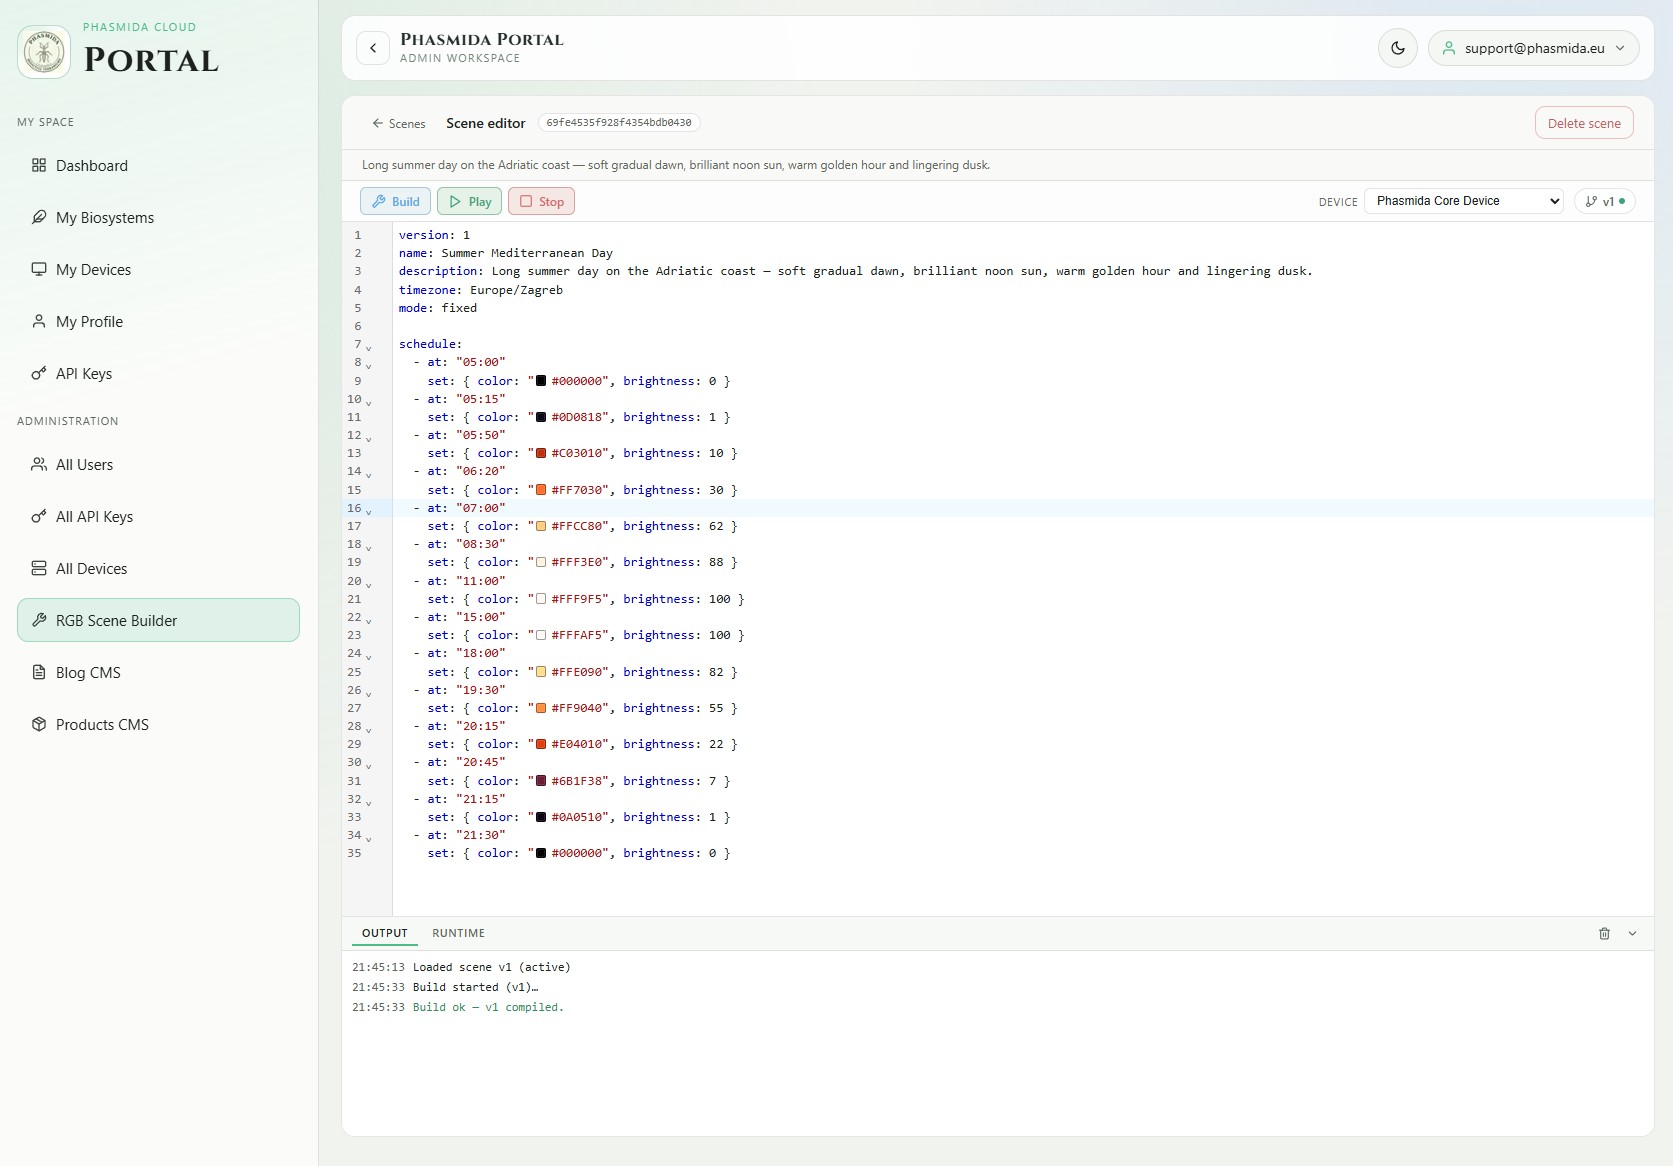
In the current system, scenes are defined in YAML and compiled into deterministic daily lighting plans. That sounds technical, but the user-facing idea is simple: a scene is a timed lighting definition that tells the device which color and brightness should be active at specific times of day.
Today, the implemented scene mode is fixed-time scheduling. That means scenes are based on explicit clock times such as morning, midday, evening, or night transitions. Phasmida compiles those definitions into a daily plan, then the scene worker evaluates the current time and sends the matching lighting state to the device.
For end users, the important outcome is not the YAML itself. It is the fact that scenes are consistent, previewable, and repeatable.
In the portal, users work with active scenes as selectable schedules. Internally, those scenes are versioned and compiled. Externally, they appear as understandable lighting programs.
That is also where the visual gradient effect comes from. What looks like a smooth timeline in the UI is backed by a real compiled lighting plan, not a decorative mockup.
At the moment, that short explanation is the accurate one to share publicly. We should not overstate scene behavior beyond fixed-time scheduling, but even in this form the system already provides a strong foundation for practical terrarium lighting control.
Example Lighting Use Cases
Even with a simple control model, Phasmida Lighting already supports several useful lighting patterns.
One example is a full-day cycle with a soft warm opening, stronger midday intensity, and a gentler evening wind-down. Another is a sunrise-style ramp that focuses on the early part of the day. A third is a dusk-oriented scene with warmer tones and decreasing brightness toward night.
These are useful because they create a better operating rhythm than isolated manual color changes. They are also much easier to understand when shown in the portal timeline than when described only as settings.
For many users, that is the point where lighting stops feeling like an add-on and starts feeling like part of the actual care environment.
Why This Matters in a Real Setup
The biggest advantage of the current Phasmida Lighting approach is not that it is flashy. It is that it makes lighting easier to trust.
The hardware is simple enough to integrate. The cloud control model is understandable. The activation flow is explicit. The schedule is visible. And the resulting lighting behavior is repeatable.
That combination matters in real terrarium use, because the challenge is rarely “can I turn LEDs on.” The challenge is whether the setup stays understandable and manageable after days or weeks of continuous use.
Phasmida tries to answer that with a lighting system that is structured rather than mysterious.
A Short Note on DLight
Generating light is only half of the story. Measuring it matters too.
That is where DLight comes in. DLight is the ambient light measurement direction in the broader Phasmida hardware setup, based on a BH1750 lux sensor. It is relevant because our current terrarium setup keeps reminding us of something very simple: it is often darker than we think.
At the moment, this is still an area we are actively exploring. The portal already has lux-oriented presentation logic, and the hardware direction is clear, but we do not want to present DLight as a finished end-to-end feature before the real-world testing is where it needs to be.
What we do want is feedback.
If you are building your own setup, experimenting with enclosure lighting, or simply want to help us understand how measured light levels behave in real terrariums, we would love to hear from you. For community testers who want to experiment with the hardware, Phasmida API keys and support are available free of charge.
That will deserve its own dedicated post, because measuring lux inside a living setup turns out to raise a different set of questions than controlling RGB output alone.
Let’s Grow This Together
Phasmida Lighting is designed to make lighting easier to use in practice: simple hardware, guided activation, visible scheduling, and scene-based control that fits into the wider Smart Cloud workflow.
And this is only one part of the larger direction. As we continue testing ambient light measurement with DLight, we want to compare what a terrarium looks like to the human eye with what the sensor actually reports in lux.
If you are already experimenting with RGB lighting, scene design, or measured light levels in your own setup, we would genuinely like to compare notes. That community feedback is exactly what helps us make the next iteration better.